

Use MP4 with H.264 encoding, AAC audio, and stay under a 4GB max file size. Default to 1080×1080 (1:1) for Feed and 1080×1920 (9:16) for Stories and Reels, and cut your video to a short duration for the best performance. Meta re-encodes every file you upload, so aim for smaller file sizes to avoid processing delays and quality loss to avoid processing delays.
TL;DR:
- Shooting one master video with subject centered in the frame allows for flexible cropping into horizontal, square, and vertical formats without losing key content.
- Export videos at 1080p with 15 to 30 Mbps bitrate and AAC stereo audio at 128 kbps or higher to ensure quality after Meta's re-encoding.
- For Feed placement, prefer 4:5 aspect ratio for mobile engagement unless the asset also runs on Instagram, where 1:1 works better for cross-platform consistency.
- Keep vertical videos within safe zones: roughly 14% at the top for profile icons, 20% at the bottom for CTAs in Stories, and 35% in Reels for overlay areas.
- Use managed services or preset templates to produce placement-optimized variations rapidly, reducing workload and campaign turnaround time.
Table of Contents
- Facebook Video Ad Specs at a Glance
- Feed Video Specs: 1:1 or 4:5?
- Stories and Reels: Vertical Specs and Where the UI Hides
- In-Stream and Audience Network: Specs for Horizontal and Mid-Form Video
- Carousel, Collection, and Marketplace Specs
- How to Export Facebook Video Ads Without Losing Quality
- Building One Master Video Into Every Placement Format
- When You Need Placement-Ready Edits Faster Than You Can Produce Them
- What I Prioritize First When Prepping Video Assets for Launch
- Placement-Ready Video Edits Without Building the Pipeline Yourself
- Sources
Facebook Video Ad Specs at a Glance
Every placement inside Meta's ad system has its own quirks, but the underlying rules stay consistent enough to memorize. The table below pulls together the numbers you'll actually use when briefing an editor or setting up a campaign, based on Meta's own Ads Guide and the placement breakdowns published by Hootsuite.
The safe-zone column matters more than most marketers give it credit for. Vertical placements like Stories and Reels layer profile icons, captions, and call-to-action buttons directly over your footage, and Vizup's integrator workflow guide documents exactly how much space that UI eats up. Get those zones wrong and your logo or CTA button ends up hidden behind a "Follow" prompt.
One more thing worth flagging: some cheat sheets recommend bumping resolution higher, to resolutions above 1080p, on the logic that sharper source files hold up better after Meta compresses them. That's a defensible move if your production pipeline already outputs at that resolution, but it's not required. Meta's compression engine treats 1080p as the practical ceiling for most placements anyway.
Feed Video Specs: 1:1 or 4:5?
Feed technically accepts a minimum resolution of 120×120 pixels and a maximum file size consistent with platform limits, but nobody serious about performance ships anything close to those extremes. The real decision facing most teams is whether to shoot square or vertical for this one placement, and the answer depends on where else that video is running.
- Choose 4:5 (1080×1350) when Facebook Feed is your primary or only placement, especially on mobile, since it fills more vertical screen space and tends to pull higher engagement.
- Choose 1:1 (1080×1080) when the same asset also runs on Instagram Feed or gets repurposed across other square-format placements, since it avoids the cropping headaches 4:5 causes elsewhere.
- Export at 1080p regardless of ratio. Anything lower looks soft on modern phone screens; anything higher just makes your file bigger without a visible payoff.
- Design your thumbnail frame deliberately. Meta pulls a static frame for the ad preview before playback starts, so avoid mid-blink faces or transition frames at the very start of your timeline.
The mobile-first bump in engagement for 4:5 over 1:1 isn't universal. It shows up specifically in campaigns where Facebook Feed carries most of the media spend, according to Hootsuite's 2026 breakdown. If your budget splits across Instagram and Facebook evenly, the cropping penalty on 4:5 content in square placements usually outweighs the mobile gain.
Pro Tip: Export two versions of your hero Feed video at the edit stage, not after launch. Swapping ratios mid-campaign to chase performance means starting your learning phase over, which costs you more than the extra render time ever would.
Stories and Reels: Vertical Specs and Where the UI Hides
Stories and Reels both run at 1080×1920, a 9:16 aspect ratio, with the same 4GB file cap as every other placement. A handful of guides list 1440×2560 as an alternative for teams working with higher-resolution source footage, but 1080×1920 remains the practical standard most editors default to.
The part that trips people up isn't the resolution. It's what covers the frame once the ad goes live.
- Reserve roughly the top 14% of your frame for profile name, username, and the mute icon that Meta overlays automatically.
- Reserve roughly the bottom 20% in Stories for the CTA button and progress bar.
- Reserve roughly the bottom 35% in Reels, since Reels stacks caption text, like/share icons, and audio credit in that zone, eating up noticeably more space than Stories does.
- Keep any burned-in captions or logo placement inside the vertical center band, not flush against the top or bottom edge.
That 35% figure for Reels surprises a lot of marketers who assume Stories and Reels share identical overlay behavior just because both run at 9:16. They don't, and Vizup's safe-zone breakdown is one of the few sources that separates the two clearly enough to design against.
Duration-wise, Stories perform best as single 15-second cards rather than one long clip, since Meta splits longer uploads across multiple cards automatically. Reels tolerate slightly longer edits, in the 15 to 30 second range, but the same rule applies everywhere in short-form vertical: whatever you're saying, say it before the five-second mark, or the algorithm and the viewer both move on.
In-Stream and Audience Network: Specs for Horizontal and Mid-Form Video
In-stream placements behave differently than Feed or Stories because they interrupt existing video content rather than sit inside a scroll. That context changes both the technical specs and the creative approach.
- Use 16:9 at a minimum of 1280×720 for traditional horizontal in-stream placements, or 1:1 at 1080×1080 if you're running the same square asset across Feed and in-stream simultaneously.
- Expect a viewing window of up to 10 minutes on mobile in-stream contexts, though most advertisers cut well under a minute since these are skippable ad slots.
- Desktop in-stream contexts sometimes impose shorter windows depending on the publisher inventory, so don't assume mobile length limits carry over.
- Front-load your message. In-stream viewers made an active choice to watch other content, and your ad is the toll they pay to get back to it, so the first five seconds need to earn the rest of the runtime.
- Skip the elaborate thumbnail work here. In-stream ads autoplay into existing content, so the thumbnail rarely gets seen the way it does in Feed.
Carousel, Collection, and Marketplace Specs
Carousel and Collection ads run on a different logic than single-video placements: consistency across cards matters as much as the specs on any one card.
- Keep every carousel card at 1:1 (1080×1080) unless you have a specific reason to mix ratios, since inconsistent framing across cards looks unfinished when a viewer swipes through.
- Image cards inside a carousel cap out at 30MB, while video cards keep the standard 4GB ceiling.
- Collection ads use a cover video or image sized the same as a standard Feed asset, with the instant experience beneath it built from Collection-specific templates rather than raw video specs.
- Marketplace and Search placements inherit Feed-like 1:1 specs, but crop more aggressively at the edges, so keep your subject and any text well clear of the outer 10% of the frame.
- Thumbnail selection matters more here than anywhere else, since Marketplace surfaces the static thumbnail heavily before any tap or hover triggers playback.
How to Export Facebook Video Ads Without Losing Quality
Meta re-encodes every file the moment it hits Ads Manager, regardless of how carefully you exported it. That single fact explains most of the "why does my ad look worse than the file I uploaded" complaints in marketer forums, and it dictates almost every export decision below.
- Container and codec: Export as MP4 using the H.264 codec. Avoid MOV unless your pipeline specifically requires it; Meta accepts it, but MP4 processes more predictably.
- Audio: Use AAC audio, stereo, at 128 kbps or higher. Mono audio technically works but sounds noticeably thin on mobile speakers.
- Frame rate: Cap frame rate at 30 fps. Meta supports up to 60 fps, but the visual difference is invisible on a phone screen and the file size penalty isn't worth it.
- Bitrate: Target 15 to 30 Mbps for 1080p exports. This is the range where you get a visibly clean result after Meta's compression pass without inflating file size for no reason.
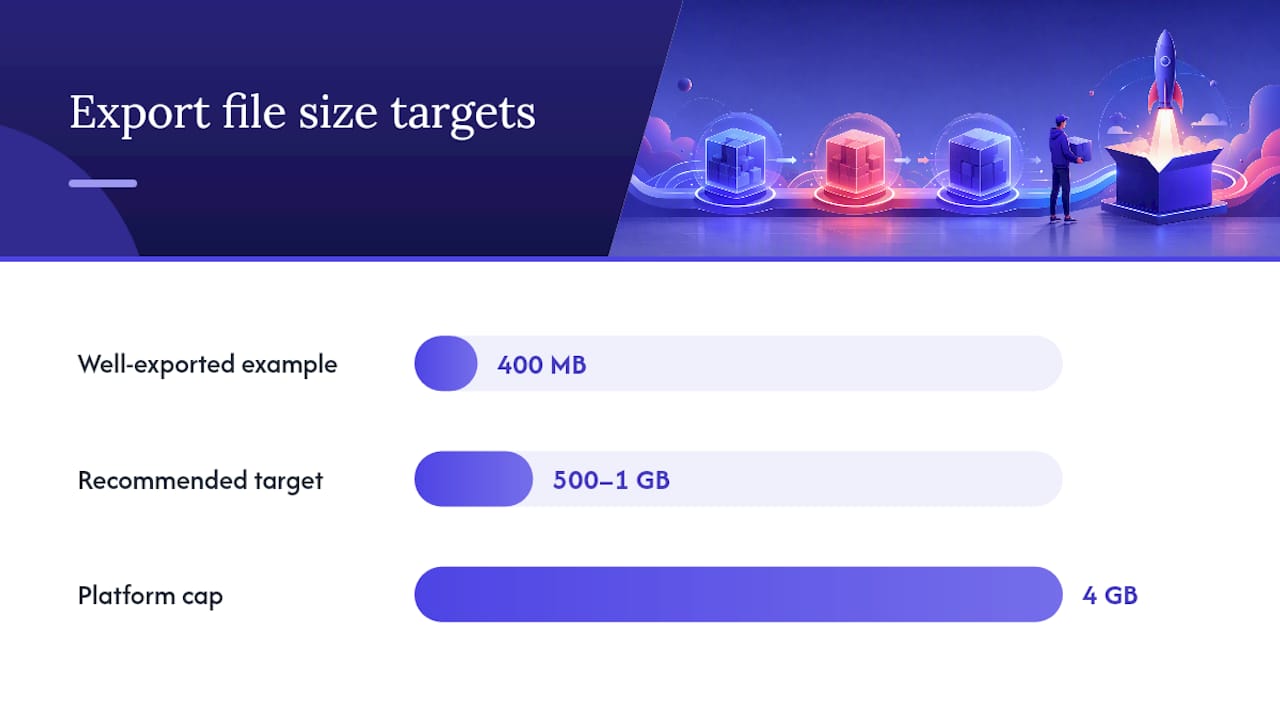
- File size: Aim to keep your final export under roughly 500MB to 1GB, even though the platform cap sits at 4GB. Smaller files upload faster, process faster, and hold up better through re-encoding than massive files do, according to Vizup's export guidance.
- Pixel format: Use square pixels and progressive scan. Interlaced footage from older broadcast equipment causes visible artifacts after compression.
- Captions: Deliver an SRT file alongside your video whenever the platform supports it, rather than burning captions permanently into the frame. Burned-in captions can't be turned off, translated, or adjusted for accessibility, and they lock you into one language version per file.
Bigger source files don't buy you insurance against Meta's compression. The platform re-encodes based on its own targets, not the quality of what you handed it, so a bloated 3GB file often looks identical to a well-exported 400MB one after processing, just with a longer upload wait attached.
Pro Tip: If an ad fails to upload with a vague error message, the fix is almost always frame rate or audio codec, not file size. Re-export at 30 fps with AAC audio before you start troubleshooting anything else.
Building One Master Video Into Every Placement Format
The efficient way to handle multi-placement campaigns isn't shooting separately for each format. It's shooting once with enough flexibility to reframe into every ratio you need.
Frame your subject inside the center third of the raw footage during the shoot. That single habit is what makes it possible to crop the same clip into 16:9, 1:1, and 9:16 without losing your subject at the edges of any version.
From that one master file, build three export presets:
- Horizontal (16:9) for in-stream and any desktop-heavy placements.
- Square or near-square (1:1 or 4:5) for Feed, Marketplace, and Carousel.
- Vertical (9:16) for Stories and Reels, with safe zones respected from the reframe stage forward, not patched in afterward.
Once those three versions exist, use Meta's Advantage+ asset customization inside Ads Manager to assign each file to its matching placement rather than letting one asset auto-crop across all of them. Auto-crop technically works, but it centers on the middle of the frame with no awareness of where your subject or text actually sits, and that's exactly how logos end up sliced in half in Stories.
Before anything goes live, run a quick QA pass: confirm safe zones on the vertical cut, confirm captions are attached or burned in correctly, confirm the thumbnail frame isn't mid-transition, and confirm your file naming convention matches whatever your team uses to track versions. A team producing a high volume of variants, the kind creative fatigue tracking makes necessary, needs that naming discipline more than a team running one static campaign.
When You Need Placement-Ready Edits Faster Than You Can Produce Them
Most in-house teams can execute the workflow above once. Doing it every week, for every new hook and every placement, is where the wheels come off. There are managed services that provide virtual assistants to take one raw video and turn it into multiple placement-optimized ad variations, sometimes delivered within one to two days.
Some services handle the reframing, safe-zone compliance, caption attachment, and format delivery for placement-optimized ad variations, delivering files ready for Advantage+ asset assignment. Keeping creative fresh at a good pace can help reduce cost per acquisition, since stale ad variations may cause CPA to increase in active campaigns.
What I Prioritize First When Prepping Video Assets for Launch
The technical specs in this guide are the easy part. Where teams actually lose time is sequencing: doing things in the wrong order and re-exporting three times because the safe zone wasn't checked until after the file was already in Ads Manager.
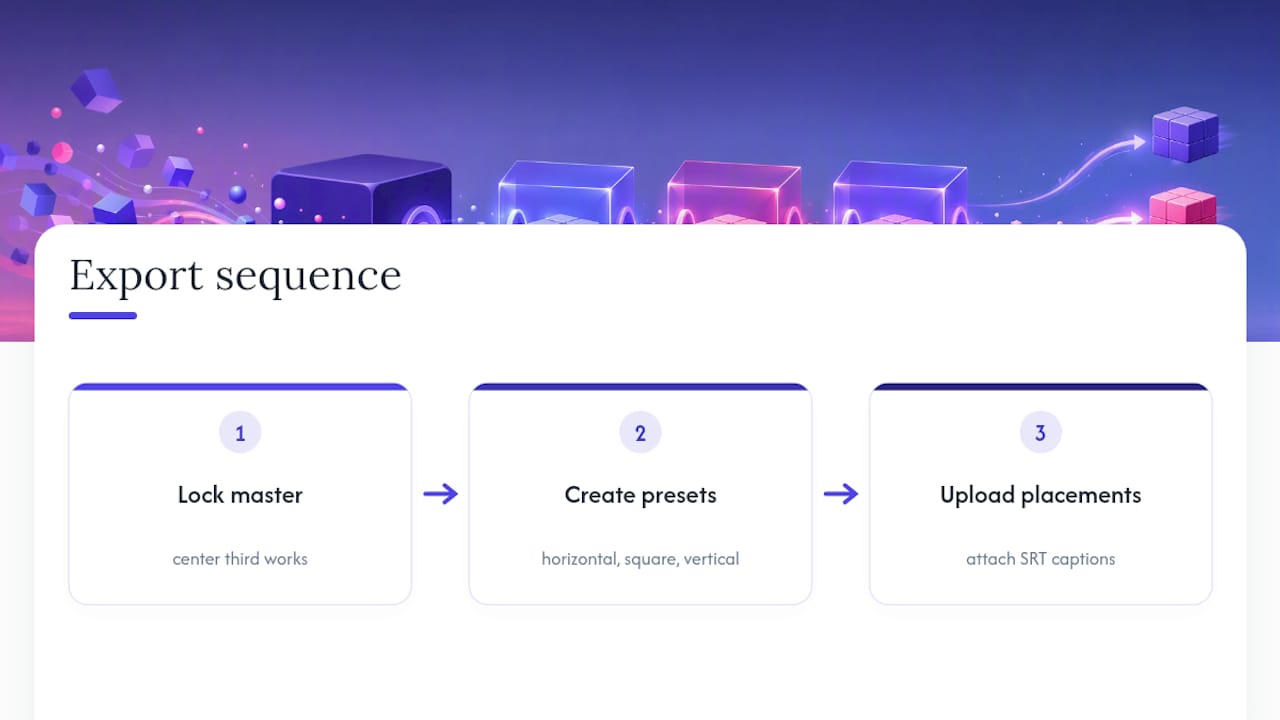
My order of operations, every time: lock the master framing first, before a single export happens, so the center third works for every ratio downstream. Second, build the three presets, horizontal, square, vertical, as templates you reuse rather than rebuilding from scratch each campaign. Third, upload placement by placement with SRT captions attached, never burned in, so language and accessibility adjustments don't require a re-render.
One habit that saves more headaches than any spec on this page: name your files by placement and date at export, not after the fact. "Feed_1x1_v3" tells you something useful six weeks later. "final_final_2" does not.
If you're running enough variants that this checklist starts feeling like a full-time job, that's the signal to look at a managed creative workflow rather than another internal hire.
— James
Placement-Ready Video Edits Without Building the Pipeline Yourself
Everything above works, but building it means owning three export presets, a safe-zone checklist, a caption workflow, and someone who actually executes all of it on a weekly cadence. That's a real operational cost most lean marketing teams don't have spare hands for.
Some managed services accept a single raw video and return multiple placement-optimized variations, cropped, captioned, and safe-zone checked, within a couple of days, providing an alternative to traditional agencies. If your team is producing the specs correctly but can't produce them often enough, see how the managed creative workflow works and get a sense of turnaround for your own volume.
Sources
These references back every number in this guide and are worth bookmarking for when Meta inevitably adjusts a limit:
- Awareness Video Ad Specs on Facebook Feed
- Facebook ad sizes and specs cheat sheet for 2026
- Meta Video Ad Specs: The Integrator's Workflow Guide (2026) | Vizup